[vc_row css_animation=”” row_type=”row” use_row_as_full_screen_section=”no” type=”full_width” angled_section=”no” text_align=”left” background_image_as_pattern=”without_pattern”][vc_column][vc_row_inner row_type=”row” type=”full_width” text_align=”left” css_animation=””][vc_column_inner][vc_column_text]

Case Study – Attic Knee Walls in Littleton

A knee wall is generally referred to any vertical wall between the conditioned space and an attic. They are present in most any home that has ceilings of different heights. Until recent building code changes, these walls have essentially been insulated the same way since the beginning and are problem almost in every case. They typically have traditional 2×4 studs with an R13 fiberglass batt crammed into them. Where to start listing the problems:[/vc_column_text][/vc_column_inner][/vc_row_inner][vc_column_text]Problem #1: The fiberglass batts almost always start falling out over time. This lets the cold or hot attic air behind the insulation rendering it completely useless. Ever try staying warm by holding a blanket 4” from your skin? Same problem here. Notice all exposed bare drywall. Drywall’s R value is only .45. It is virtually just a bed sheet between the conditioned space inside and the attic temperatures.[/vc_column_text][vc_separator type=”transparent” up=”20px”][vc_row_inner row_type=”row” type=”full_width” text_align=”left” css_animation=””][vc_column_inner width=”1/2″][vc_single_image image=”1618″ img_size=”full” onclick=”link_image” qode_css_animation=””][/vc_column_inner][vc_column_inner width=”1/2″][vc_single_image image=”1629″ img_size=”full” onclick=”link_image” qode_css_animation=””][/vc_column_inner][/vc_row_inner][vc_separator type=”transparent” up=”20px”][/vc_column][/vc_row][vc_row css_animation=”” row_type=”row” use_row_as_full_screen_section=”no” type=”full_width” angled_section=”no” text_align=”left” background_image_as_pattern=”without_pattern”][vc_column][vc_row_inner row_type=”row” type=”full_width” text_align=”left” css_animation=””][vc_column_inner][vc_column_text]When we look at the walls with a thermal camera…. Wow.[/vc_column_text][/vc_column_inner][/vc_row_inner][vc_separator type=”transparent” up=”20px”][vc_row_inner row_type=”row” type=”full_width” text_align=”left” css_animation=””][vc_column_inner width=”1/2″][vc_single_image image=”896″ img_size=”full” onclick=”link_image” qode_css_animation=””][vc_column_text]Notice the temperature on the INSIDE of the sheetrock is 111 degrees. It is no wonder this customer was uncomfortable in their bedroom.[/vc_column_text][/vc_column_inner][vc_column_inner width=”1/2″][vc_single_image image=”897″ img_size=”full” onclick=”link_image” qode_css_animation=””][vc_column_text]This was our home shortly after we purchased it. It was built in 2006. It was a cold winter until we freed up enough time to address it.[/vc_column_text][/vc_column_inner][/vc_row_inner][vc_separator type=”transparent” up=”20px”][/vc_column][/vc_row][vc_row css_animation=”” row_type=”row” use_row_as_full_screen_section=”no” type=”full_width” angled_section=”no” text_align=”left” background_image_as_pattern=”without_pattern”][vc_column][vc_column_text]Problem #2: When the fiberglass batts were installed, they were laid perpendicular to the wall studs and/ or across wiring. This “throw and go” method of installing fiberglass batts leaves the dreaded air gap again. We cannot have any air gaps between the insulation and the drywall.[/vc_column_text][vc_separator type=”transparent” up=”20px”][vc_row_inner row_type=”row” type=”full_width” text_align=”left” css_animation=””][vc_column_inner width=”1/2″][vc_single_image image=”1621″ img_size=”full” onclick=”link_image” qode_css_animation=””][vc_column_text]This fiberglass batt was laid across wiring and perpendicular to the studs.[/vc_column_text][/vc_column_inner][vc_column_inner width=”1/2″][vc_single_image image=”901″ img_size=”full” onclick=”link_image” qode_css_animation=””][vc_column_text]I’m not sure if the original installers even owned a knife.[/vc_column_text][/vc_column_inner][/vc_row_inner][vc_separator type=”transparent” up=”20px”][/vc_column][/vc_row][vc_row css_animation=”” row_type=”row” use_row_as_full_screen_section=”no” type=”full_width” angled_section=”no” text_align=”left” background_image_as_pattern=”without_pattern”][vc_column][vc_column_text]Problem #3: When air moves through fiberglass batt insulation, it significantly reduces it’s R value. Much like wearing a sweater on a windy winter day. The air moves the heat away through convection.  If we put a wind breaker on over the sweater, which has almost no insulation value, it stops the air and allows the sweater to do it’s job and slow conduction.[/vc_column_text][vc_separator type=”transparent” up=”20px”][vc_row_inner row_type=”row” type=”full_width” text_align=”left” css_animation=””][vc_column_inner width=”1/2″][vc_single_image image=”903″ img_size=”full” onclick=”link_image” qode_css_animation=””][vc_column_text]Hot air is moving down the knee wall and through the fiberglass batt insulation itself. The hot hair is reducing the insulations’ ability to slow conduction.[/vc_column_text][/vc_column_inner][vc_column_inner width=”1/2″][vc_single_image image=”2262″ img_size=”full” onclick=”link_image” qode_css_animation=””][vc_column_text]This thermal picture shows how the fiberglass batts being exposed to the very cold attic air has almost rendered it useless. The triangle shape at the bottom is from the existing blown in loose fill insulation that has been blown up against the wall.[/vc_column_text][/vc_column_inner][/vc_row_inner][vc_separator type=”transparent” up=”20px”][/vc_column][/vc_row][vc_row css_animation=”” row_type=”row” use_row_as_full_screen_section=”no” type=”full_width” angled_section=”no” text_align=”left” background_image_as_pattern=”without_pattern”][vc_column][vc_column_text]Problem #4: Fiberglass batts fit between the studs. What about insulating the studs? Wood is a great conductor of heat. It is approximately an R1 per inch. When the insulation is blown in on the attic floor, all of the joists are covered and well insulated. Not so on these knee walls.[/vc_column_text][vc_separator type=”transparent” up=”20px”][vc_row_inner row_type=”row” type=”full_width” text_align=”left” css_animation=””][vc_column_inner width=”1/2″][vc_single_image image=”905″ img_size=”full” onclick=”link_image” qode_css_animation=””][vc_column_text]It is very easy to see where the studs are on this knee wall. As a comparison, we can just barley see the horizontal ceiling joists. They are covered by the blown in insulation and are insulated form the attic temperatures.[/vc_column_text][/vc_column_inner][vc_column_inner width=”1/2″][vc_single_image image=”2158″ img_size=”full” onclick=”link_image” qode_css_animation=””][vc_column_text]We can see the studs on this knee wall are all exposed to the attic temperatures. Also, the bottom of the knee wall is open to floor joist cavities. This is allowing air to move freely between the second story floor and ceiling below.[/vc_column_text][/vc_column_inner][/vc_row_inner][vc_separator type=”small” position=”center” color=”#848484″ up=”20px” down=”20px”][/vc_column][/vc_row][vc_row css_animation=”” row_type=”row” use_row_as_full_screen_section=”no” type=”full_width” angled_section=”no” text_align=”left” background_image_as_pattern=”without_pattern”][vc_column][vc_column_text]

How do we fix these problems?

[/vc_column_text][vc_separator type=”transparent” up=”20px”][vc_row_inner row_type=”row” type=”full_width” text_align=”left” css_animation=””][vc_column_inner width=”1/2″][vc_column_text]Step 1:

Ensure the entire stud cavity is filled with insulation. No air gaps at all.[/vc_column_text][vc_single_image image=”1836″ img_size=”full” onclick=”link_image” qode_css_animation=””][/vc_column_inner][vc_column_inner width=”1/2″][vc_column_text]The fiberglass batts are not compressed and are all properly fitted.[/vc_column_text][vc_single_image image=”1840″ img_size=”full” onclick=”link_image” qode_css_animation=””][/vc_column_inner][/vc_row_inner][vc_separator type=”transparent” up=”20px”][vc_separator type=”small” position=”center” color=”#848484″ up=”20px” down=”20px”][/vc_column][/vc_row][vc_row css_animation=”” row_type=”row” use_row_as_full_screen_section=”no” type=”full_width” angled_section=”no” text_align=”left” background_image_as_pattern=”without_pattern”][vc_column][vc_column_text]

6-Sided Encapsulation
Add an air tight fiberglass blanket or encapsulate with two part closed cell spray foam?

[/vc_column_text][vc_separator type=”transparent” up=”20px”][vc_row_inner row_type=”row” type=”full_width” text_align=”left” css_animation=””][vc_column_inner width=”1/2″][vc_column_text]
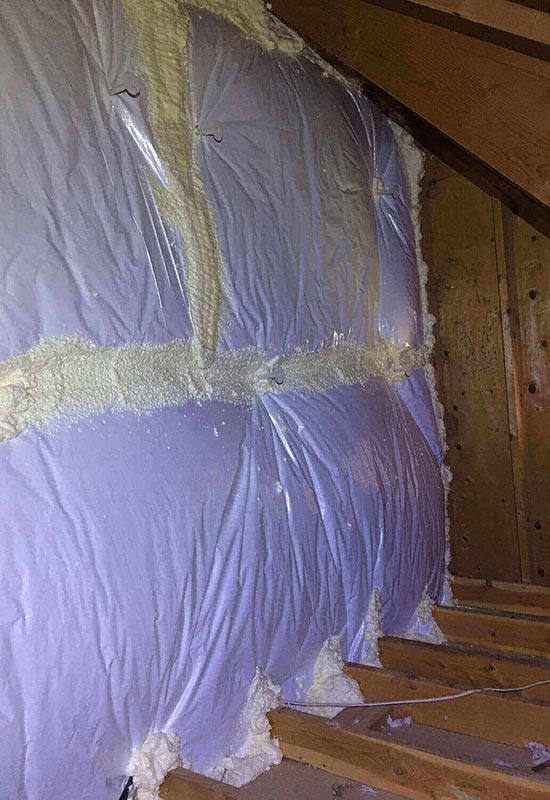
Step 2: Seal and insulate either with a fiberglass blanket or encapsulating with Closed Cell SPF.

Blanket method: This is an R19 6” Fiberglass blanket with a white trilaminate air tight facing. This blankets do not have the vinyl or “diaper” facing. The vinyl facing just does not hold up over time.[/vc_column_text][vc_single_image image=”1838″ img_size=”full” onclick=”link_image” qode_css_animation=””][vc_column_text]All of the seams and the perimeter have been sealed. This adds an additional R19 to the wall, insulates all the studs to stop any thermal bridging and provides an airtight assembly. By adding an R19 to the existing R13 cavity insulation, the knee wall assembly total R value is near R30 and is air tight.[/vc_column_text][/vc_column_inner][vc_column_inner width=”1/2″][vc_column_text]This knee wall has been encapsulated with 2 part closed cell spray foam. At an R6 per inch, it provides an air barrier and outstanding thermal break.[/vc_column_text][vc_single_image image=”1827″ img_size=”full” onclick=”link_image” qode_css_animation=””][vc_column_text]One downs side to spray foam down side is cost. Spray foam, or SPF, has a high material cost in comparison to traditional materials. We have found that both methods work equally as well in this application (with a few exceptions).[/vc_column_text][/vc_column_inner][/vc_row_inner][vc_separator type=”transparent” up=”20px”][/vc_column][/vc_row][vc_row css_animation=”” row_type=”row” use_row_as_full_screen_section=”no” type=”full_width” angled_section=”no” text_align=”left” background_image_as_pattern=”without_pattern”][vc_column][vc_column_text]

The key is that the blankets are sealed air tight. I know this is repetitive, but I cannot stress this enough. We have seen quite a few poor installations with good intentions. We have seen poly sheeting used as an air barrier, Thermoply and rigid foam. 99% of them allowed a lotof air in did a very poor job improving over the existing insulation. I’m going to brag a bit here on our crew. They make these blankets look better than I can make my own bed. When we look at these knee walls with a thermal camera, they look perfect. There isn’t any thermal bridging or air leakage detected.

[/vc_column_text][vc_separator type=”transparent” up=”20px”][vc_row_inner row_type=”row” type=”full_width” text_align=”left” css_animation=””][vc_column_inner width=”1/2″][vc_single_image image=”2438″ img_size=”full” onclick=”link_image” qode_css_animation=””][/vc_column_inner][vc_column_inner width=”1/2″][vc_single_image image=”2436″ img_size=”full” onclick=”link_image” qode_css_animation=””][/vc_column_inner][/vc_row_inner][vc_separator type=”transparent” up=”20px”][/vc_column][/vc_row]